Monday, June 1, 2015

Kombucha - Step by Step

Drinking Kombucha reminds me of a very fizzy fruit drink and when I play around with different fruit combinations the taste is divine! 

Kombucha is a fermented tea made with a kombucha starter culture (I use a scoby). The tea is prepared with boiled distilled water, sugar, fresh tea bags, and some kombucha tea from a previous batch (starter tea). 

The mixture is allowed to ferment at room temperature and can be consumed plain but I really like it after a 2nd ferment when flavoured with different fruit or juice combinations. A longer fermentation time gives a more cultured drink with a more vinegary taste - adding fruit or juice in 2nd fermentation can sweeten the Kombucha.

Kombucha
(3 quarts = 12.49 cups Cdn)
3 quarts distilled water (12 cups)
1 cup organic cane sugar
2 tea bags, Oolong or Jasmine
3 tea bags, Green
1 scoby with 6 ounces harvested tea

1st Ferment
  • Bring 6 cups (1/2 of the water) to a boil
  • Remove from heat, add the cup of sugar and stir with a wooden spoon to dissolve
  • Add the 5 tea bags (2 Oolong, 3 Green)
  • Steep tea bags for 15 to 30 minutes - remove and discard the tea bags - cool tea to room temperature
  • When completely cooled, mix in the remaining 6 cups (other 1/2 of the distilled water)
  • Pour the tea into a one gallon container (or divide between two 2-quart glass jars
  • No metal should touch the mushroom (scoby)
  • Add a whole scoby to the one gallon container placing the darker side down (or if using two jars, divide the scoby in half placing each half into a jar)
  • Add a large scoop of harvested tea from a previous batch (when you receive a scoby it comes in a bag or jar with harvested tea)
  • Cover each jar with a thin, clean handkerchief, white cloth, or paper towel and secure with a rubber band
  • Place in a dim, quiet ventilated space 70-90 degrees for 7-10 days
  • After a week or so, taste to see if it is to your liking (shorter time is sweeter)
  • When tasting try not to disturb the new scoby, which grows on top of the mother scoby - poking a straw down the side of the jar is an easy way
  • Separate baby scoby from mother scoby and set both aside with 6 ounces of this new harvested tea to make more Kombucha


2nd Ferment
  • After the tea is cultured I do a 2nd ferment by pouring the tea into clear glass jars and add fruit or juice to each bottle (Grolsch bottles with flip tops are my bottles of choice - I buy them from the bottle recycling depot)
  • Put a lid on and leave sitting in a warm place until fizzy (I keep mine in a camping cooler) just remember to release gases by burping the bottles each day
  • Taste and when to your liking, strain and store in the fridge
  • Work up to drinking 4 ounces or more a day - before, after, or between meals
Flavourings

I add Ginger slices to every batch but am always experimenting with new flavourings:
Pear
Blueberry
Blackberry, hibiscus
Rose Hips, hibiscus
Raspberry lemonade
Strawberry lemonade
Mango
Cranberries


Sunday, May 24, 2015

Asian Sprouted Lentil Salad


Lentils are an excellent source of folate for your nervous system and heart health. Pairing iron-rich lentils with foods high in vitamin C (like tomatoes and oranges) help your body absorb the iron. Soaking the lentils with a piece of Kombu or dried kelp infuses the beans with minerals and enhances digestibility. This works in either sprouting or cooking, but sprouting is known to further enhance this process. 

Asian Sprouted Lentil Salad
Yield:  1-1/2 cups

Salad:
1 cup lentils, dry (with a piece of kelp)
1/2 cup red onion, diced
1/2 cup sweet bell pepper, diced
1 carrot, grated
1/4 cup cherry tomatoes
1/4 cup frozen organic peas
1/4 cup fresh cilantro, chopped finely
  • Soak the lentils in 2 cups water for 12 hours or overnight with a piece of Kombu or Kelp
  • Drain off the water in the morning, then rinse and drain every day for 3-4 days until sprouts have started to form
  • Keep the lentils covered with a damp paper towel to prevent them from exposure to airborne pathogens 
  • When the lentils have sprouted, combine them in a glass bowl with the other salad ingredients
Dressing:
1 Tbsp Organic Tamari
1/2 Tbsp Sunflower Lecithin
2 Tbsp Fresh Lime Juice
2-3 Tbsp Raw Apple Cider Vinegar
1 clove garlic, pressed
2 Tbsp Ground Sesame Seeds  
2 tsp agave
  • Mix together the dressing ingredients in a small blender (I use a Tribest)
  • Add dressing to the bowl containing the salad and toss together to mix
  • Refrigerate awhile to let the flavours mingle
__________________________________

For those times when I have not planned ahead (and yes it does happen) when there is no time to sprout I will cook a small amount of lentils that is enough for a meal. Today was one of those days and this is my lunch. 

Cooked Lentil Version 
Yield:  1 cup

Salad:
1/2 cup lentils, cooked
Yellow bell pepper, chopped
Cherry tomatoes, cut in half
3 radishes, sliced thin
2 celery, chopped

Dressing:
Make the same dressing as above and any extra can be stored in a sealed container in the fridge for another day.


Sunday, May 10, 2015

Peanut Butter-Coconut Bites (for the PB Officianado)


These were one of the snacks I made for the Seed Savers meeting this week and since they didn't last long (they were gobbled up really fast) I needed to make another batch for myself. 

I wondered if there was any value in sharing this - but then again why not? Even though this recipe was originally called Raw Coconut Bites, I felt like changing it into to something new. 

Each time I make a recipe (whether an old standby or a new experiment) I'm in a different space with different ideas that are just waiting to be tried and tested. From there the recipes seem to evolve . . . like this one did!

Peanut Butter-Coconut Bites
Yield:  30-1" bites

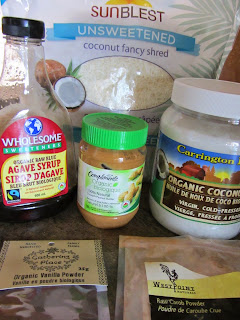
1-3/4 cups coconut flakes (shredded)
1/2 cup raw carob powder

1/8 tsp Vanilla powder
pinch of Himalayan salt
1/3 cup Agave
2 Tbsp peanut butter (raw organic and definitely not roasted)
1/4 cup Coconut Oil, melted

  • Start by melting the coconut oil (either heat in a dehydrator, or melt in a jar sitting in a bowl of warm water)
  • Mix ingredients to underline together in a bowl, set aside
  • Mix together the Agave and peanut butter in a measuring cup BEFORE adding to the bowl
  • When first 6 ingredients are combined, add melted coconut oil to the bowl and mix again 
  • Form into bite-sized balls with your hands
  • Put in fridge to set, store covered in the fridge, or store inside freezer bags in the freezer
    This recipe uses only seven ingredients and is super easy to make. Simply changing a few of the ingredients and combining them in a different way opened me to the discovery of a new taste and texture in each mouth-watering bite. 

    Friday, April 24, 2015

    Getting Fit . . . for the Fun of it


    My personal goal is to make healthy living a little bit easier and a lot more fun. More and more I find myself not only drawn to but very much enjoying exercise, especially if it is outdoors.

    In the past working out was always hard, but it's been a lot easier since I made the decision to keep it fun, change it up, and throw in a few tests to surpass along the way. Recording my progress and challenges shows me what is possible.
     Read more...

    Tuesday, April 21, 2015

    Asian Living Rice: Parsnips in the Raw


    Yesterday I pulled the first parsnip from my garden - and here's the rice dish I made today from that parsnip! Although this recipe will serve two people, it can easily be doubled or tripled for larger groups.

    Asian Living Rice
    1 cup parsnip, chopped
    1/2 cup red pepper, seeded and chopped
    1/2 cup snow peas, chopped
    1 green onion, chopped
    • In a food processor, process parsnip into rice-like bits, remove to a bowl
    • To the bowl add red pepper, snow peas, green onion and mix together
    Dressing
    1/2 tsp ginger, grated
    1-1/2 Tbsp Tamari
    pinch of garlic powder
    1/2 tsp honey or agave
    1 tsp rice vinegar
    1/2 tsp Sesame oil
    1/2 Tbsp unhulled Sesame seeds
    • In a small bowl, whisk together dressing ingredients
    • Pour dressing into bowl with rice ingredients and mix well
    • Eat it fresh, or dehydrate to enhance the flavours
    • To dehydrate, place in a shallow casserole in bottom of dehydrator and dehydrate at 105 degrees for up to one hour

    Raw Homemade Mustard . . . DIY


    When my friend gave me a jar of this mustard from the Internet (go here) I was blown away by the taste and texture. This recipe is definitely worth trying for a healthy, nutrient rich condiment that is free of extra salt and preservatives.

    Raw Homemade Mustard
    Yield:  5" jar

    2⁄3 cup yellow mustard seeds
    1⁄2 cup apple cider vinegar
    2⁄3 cup water

    2 Tbsp fresh thyme
    1.5 Tbsp fresh rosemary
    Pinch chili flakes (careful this will make it hot)
    1⁄3 tsp sea salt
    1 tsp raw honey (animal product)
    1⁄4 cup water at room temperature
    • Mix apple cider vinegar with water and add mustard seeds
    • Leave to soak for 2 to 3 days while the mustard seeds absorb almost all of the liquid
    • Add mustard mix to a blender with the rest of the ingredients and blend to a smooth consistency
    • If mixture is too thick add 2 Tbsp water at a time and continue blending until smooth
    • Spoon into a glass jar leaving no air bubbles and keep covered in fridge
    • This mustard will keep in the fridge for a few months - but is best consumed fresh - and can be added to salad dressings!

    Wednesday, April 8, 2015

    Creamy Chocolate Mousse: Avocado Lovers Delight


    I'm enjoying my visit to Texas, but have been missing some of my basic raw foods! Recipes that are so quick and simple to make at home can become a challenge without a food processor. (A Vitamix blender, Cuisinart food processor, and an Excalibur dehydrator are my kitchen helpers at home.)

    Just thinking about this mousse made my mouth water. And using what local ingredients I could find was well worth the effort . . . for this sweet taste of home.  


    Kitchen Tips:  I substituted raisins for the dates, liquid vanilla for vanilla powder, and natural unsweetened cocoa powder for raw carob powder. Using a food processor = a thick, creamy, silky smooth mousse; Using a Nutri Bullet = chunks and bits of raisins, semi-smooth mousse, and much more work; But the taste was close and the mousse was sooo satisfying topped with organic strawberries. 


    Creamy Chocolate Mousse
    Yield:  2 servings

    1/4 cup pitted Medjool dates, soaked

    1/4 cup Date Paste or agave
    1/4 tsp vanilla powder
    3/4 cup mashed avocados (1-1/2 avos)
    1/4 cup raw carob powder
    1/3 cup water
    • Place the dates, date paste or agave and vanilla in a food processor with the S-blade and process until smooth (because Medjool dates are soft they are easy to process)
    • Add avocado and carob powder and process again
    • Stop occasionally to scrape down the sides of the food processor bowl with a spatula
    • Add the water and process briefly
    • Stored in a sealed container, mousse will keep in fridge for 3 days or 2 weeks in the freezer

    Saturday, March 28, 2015

    Spicy Texas Green Smoothie (So Easy, So Good)


    Ever added an apple to your GS and had it separate into layers? If this has been your experience try adding a banana and blueberries. The result will be a thick and creamy GS because both banana and blueberries have soluble fibre.

    Insoluble fibre passes through our intestines largely intact - while soluble fibre prolongs stomach emptying time and may affect blood sugar levels as sugar is released and absorbed more slowly.

    And this combination of arugula and ginger added a spicy earthy flavour that I very much enjoy.

    Spicy Texas GS

    Arugula greens, large handful
    1 orange, peeled and seeded
    1 banana, peeled
    Handful blueberries
    1 Tbsp fresh Organic ginger, grated
    1 cup water 
    • Blend all ingredients together until smooth and creamy
    • At home I use a Vitamix, but here I'm using a Nutri Bullet
    • After tasting I decided to add some ginger and blueberries at the end